Jun 28, 2012

Pool Party Please

Everywhere you turn someone is talking about how HOT it is! 
Yep, it's hot. But living in beautiful So Cal it's nothing I can complain about. 
I actually don't mind the heat!
I just wish I had a big backyard with a pool so I could throw a party (every weekend)! 
Is this too much to ask..........??


Images via pinterest.


Jun 19, 2012

Apartment Therapy - Upholstery Case Studies

When people find out I work in the interior design industry they immediately ask for my advice on anything and everything related to their home. 

The number one question usually starts off with: "I have this {fill in the blank} that I want to have reupholstered....Is it worth it??" Unfortunately I never have a definite answer! 
It depends on quite a few factors - Was the item valuable to begin with? How much is the labor going to cost you? How much is the fabric? Does it need re-finishing? etc..

Apartment Therapy just covered this topic - check it out for real-life examples on what people paid for their re-upholstery projects.


Jun 13, 2012

Ikea Hacks

Now that I'm a married lady I've decided that it's time to grow up and start saving some $$ for our future.  Being homeowners is at the top of our list so it's time to crack down! I even made a budget for myself just yesterday and it looks like I won't be spending like I used to. 

So where will I shop when I need a design fix?? Ikea of course!

Ikea "Hacks" are everywhere! It seems like everyday I see a new way to transform a basic Ikea piece into something truly special. Remember the great Rast Hack I showed you here?

Well here are a few more to inspire you....


Spray paint the Vittsjo shelving unit ($70) gold for instant glamour! 


Bekvam Kitchen Cart ($59.99) gets a major upgrade with a little elbow grease, paint & hardware.
See how it was done here.


The Rast Chest ($34.99) does it again!
Check out the how to here.

I couldn't find the six drawer dresser on Ikea but the Trondheim 3 drawer chest also works.
See instructions here.

Jun 11, 2012

DIY: Candle Favors

A while back I showed you a sneak peek of my wedding favors & asked if you could guess what's inside...

I bet you didn't guess home made custom candles?!

Once again my amazing girlfriend Katie helped me pull this together. Okay...maybe she pretty much did the whole thing herself but I was there to help! She's done this before and had most of the supplies (and knowledge!) so it was a no-brainer.


BASIC STEPS:


1. Clean the glass containers
2. Glue the wicks to the glass
3. Cut the wax - We used a clay cutting tool similar to this.
4. Measure out the pounds of wax (we did approx. 4lbs per container but it depends on your glass size)
5. Measure out the scent (1 oz of scent per 1lb of wax) - I obviously chose a "Pear" scent
6. Melt the wax to 200°F
7. Remove the wax from heat
8. Let cool to 170 degrees and add the scent
9. Let the wax continue to cool to 160 degrees and pour the scent into the glasses
10. Hold the wicks in place with the holders and let cool overnight
11. Cut the wicks
12. Use a cloth to wipe off any excess wax that may have dripped on the glass
13. Put them in the boxes, throw in a match book and tie a bow


They looked so professional that people didn't believe they were custom made. 
Thanks Katie!!!


*For more info on candle making and supplies visit Natures Garden


Jun 7, 2012

Bridesmaid Gifts

What do you get the fabulous ladies that stand beside you on your big day?? I struggled with this for quite some time. First I wanted to get them some sort of lounge wear suit (think Juicy but not so trendy) but I figured that was way too played out - not to mention the fact that it was a bit pricey when you times it by 5. 

So after searching and searching I found these cute orange and white striped totes from Forever21.com that went well with my peach and lavender color scheme. Now I just had to fill them with something.... I thought a shawl would be a great filler and could be used on the day of the wedding. I also found these for a steal at Forever.  And then for something a little special...I found these perfect gold plated wishbone necklaces from Etsy. Of course I had to get one for myself! 

To top it off I also paid for their hair and makeup for the wedding. 
Not that any of them needed professional help! - They are all so insanely gorgeous. 


Jun 5, 2012

DIY: Scalloped Photo Booth Backdrop

Now that the wedding has come and gone I am having major withdrawals! Everyone warned me that this might happen but without even a honeymoon to help ease me into reality it's been rough (my new countdown is for Tahiti in October. It can't come soon enough!). 

Don't get me wrong, being a newlywed is one of the best feelings and we couldn't be happier!! I just wish I could hang on to that Wedding bliss a tad bit longer....

So what's a girl to do? Blog about her wedding projects of course! As promised, here are the steps I took in creating my photo booth backdrop.

Yes, I'm a goofball and I have insanely gorgeous friends...


Disclaimer: This took a lot longer than I had anticipated!! If I could do it again I would change up a few things.


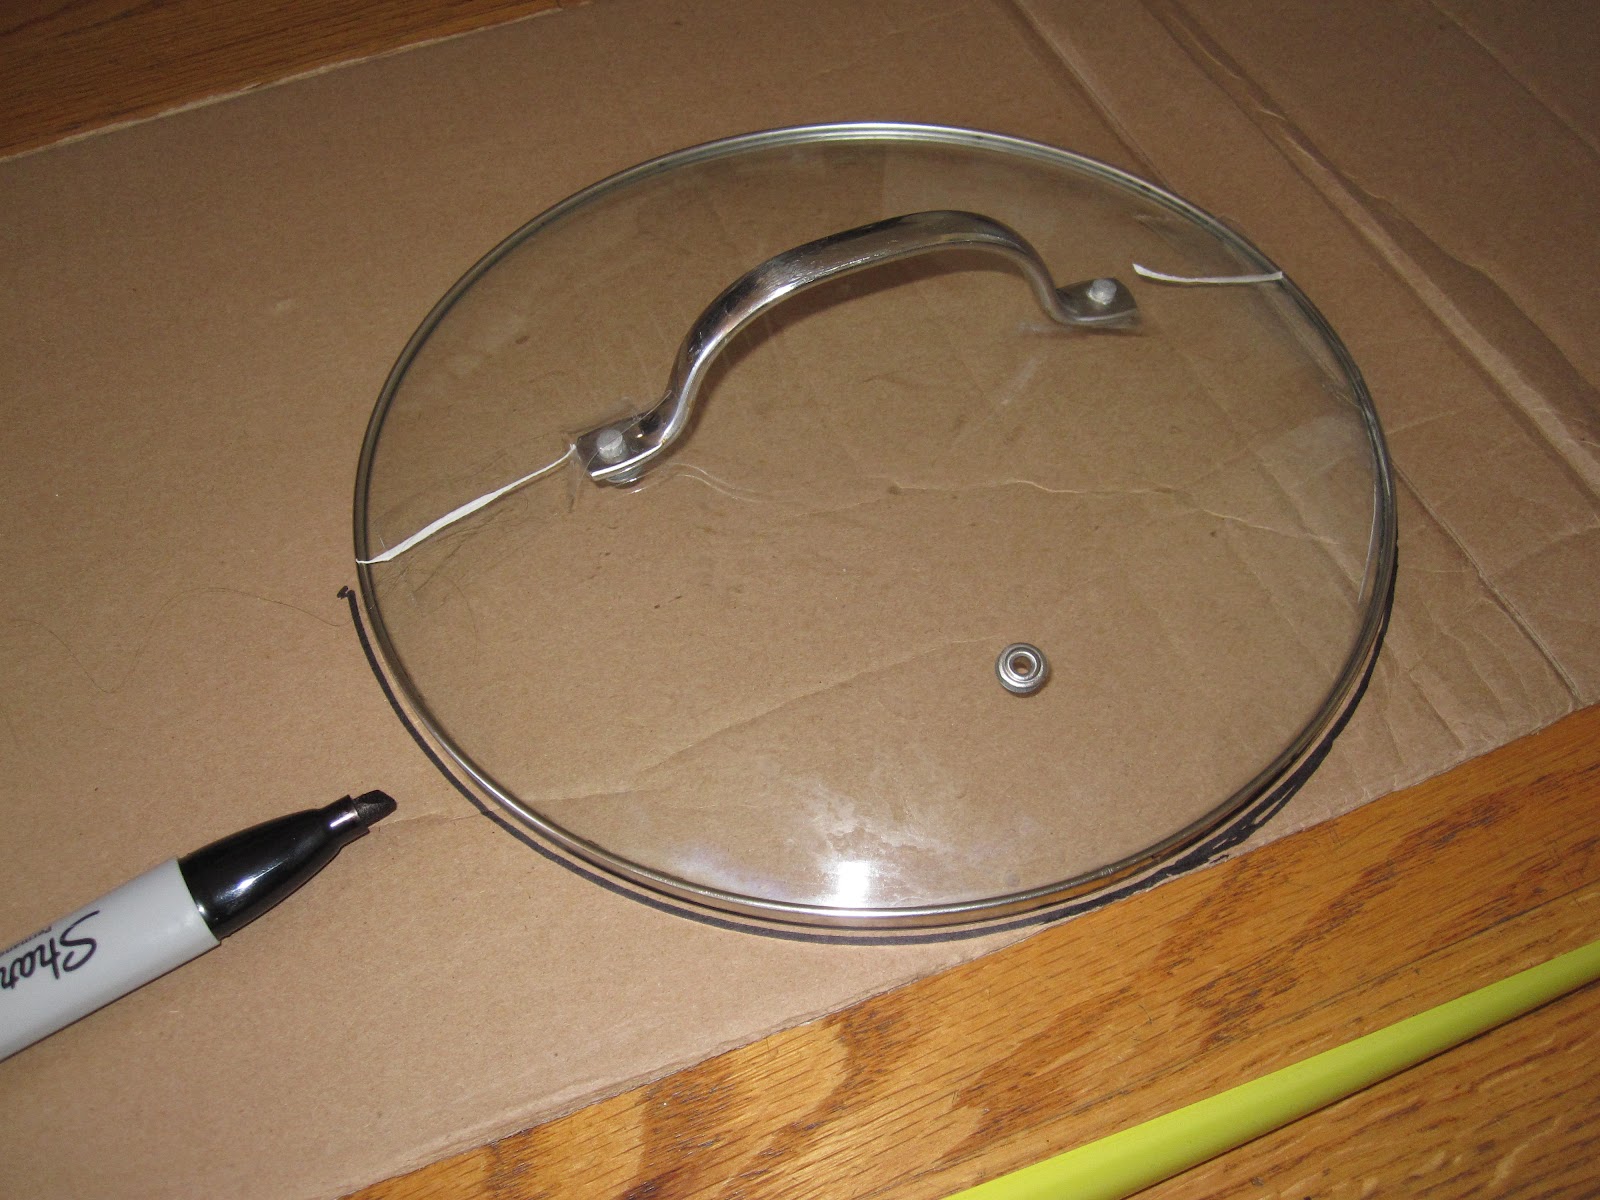
STEP 1 - MAKE SCALLOP TEMPLATE

I created an 8'strip of cardboard from one of the many gift boxes we received in the mail! 

I then searched my apt for any circular shape that was the right size. This pot lid did the trick! The handles helped me find the center line so I could create a half circle shape. I grabbed a marker and started tracing along the cardboard strip.


STEP 2 - CUT FABRIC STRIPS

8' long and about 15" high - this took a LOT of fabric!


STEP 3 - CUT OUT SCALLOPS

I used a sewing crayon to trace the template onto each strip of fabric - all 29 strips!

I laid out a couple strips to make sure the pattern was lining up right...


STEP 4 - DYE THE FABRIC

This is where a whole day can be wasted. I thought it would be easy enough to just dye the strips of fabric with Rit Dye and create an ombre affect. This took me 9 straight hours of running the washer and dryer!! (I made sure to run the cycle on low so I didn't use too much water).  Thank goodness for best friends that have a W+D in their apt for me to use.

**This is where I failed. It would have been much easier to find fabric in the colors you want. It would have cut back on time and helped control the colors 
(it was always a surprise to see what color the dye created!)


STEP 5 - PUT IT TOGETHER!

Time consuming? YES! I laid out each fabric strip one by one on top of a large flat sheet. If I didn't like the gradient color I would have to lift it up carefully and re-arrange. Once I was satisfied with the layout I used a large glue gun and set it in place. I then secured flaps of Velcro throughout the top and sides so it could be secured to the pipe stand provided by the photo booth company.